Knit need for both walls of the loops, unless otherwise specified, in a spiral.
the number of loops in the row coincided with the number indicated in brackets at the end of the row.
Used materials and tools:
Head, hands, clothes, shoes:
1) For the body, you can use any thread of a suitable flesh color, I used Cotton “Iris” Gamma
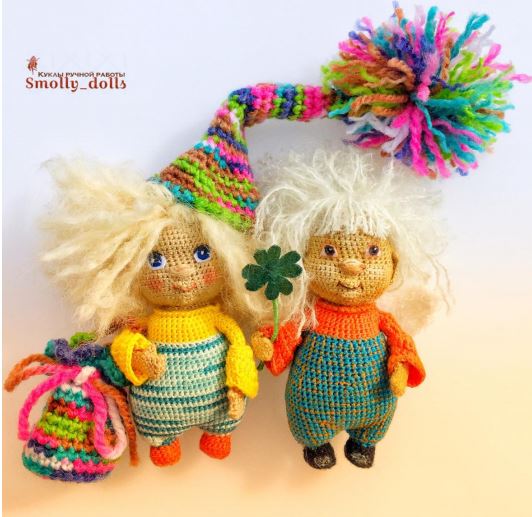
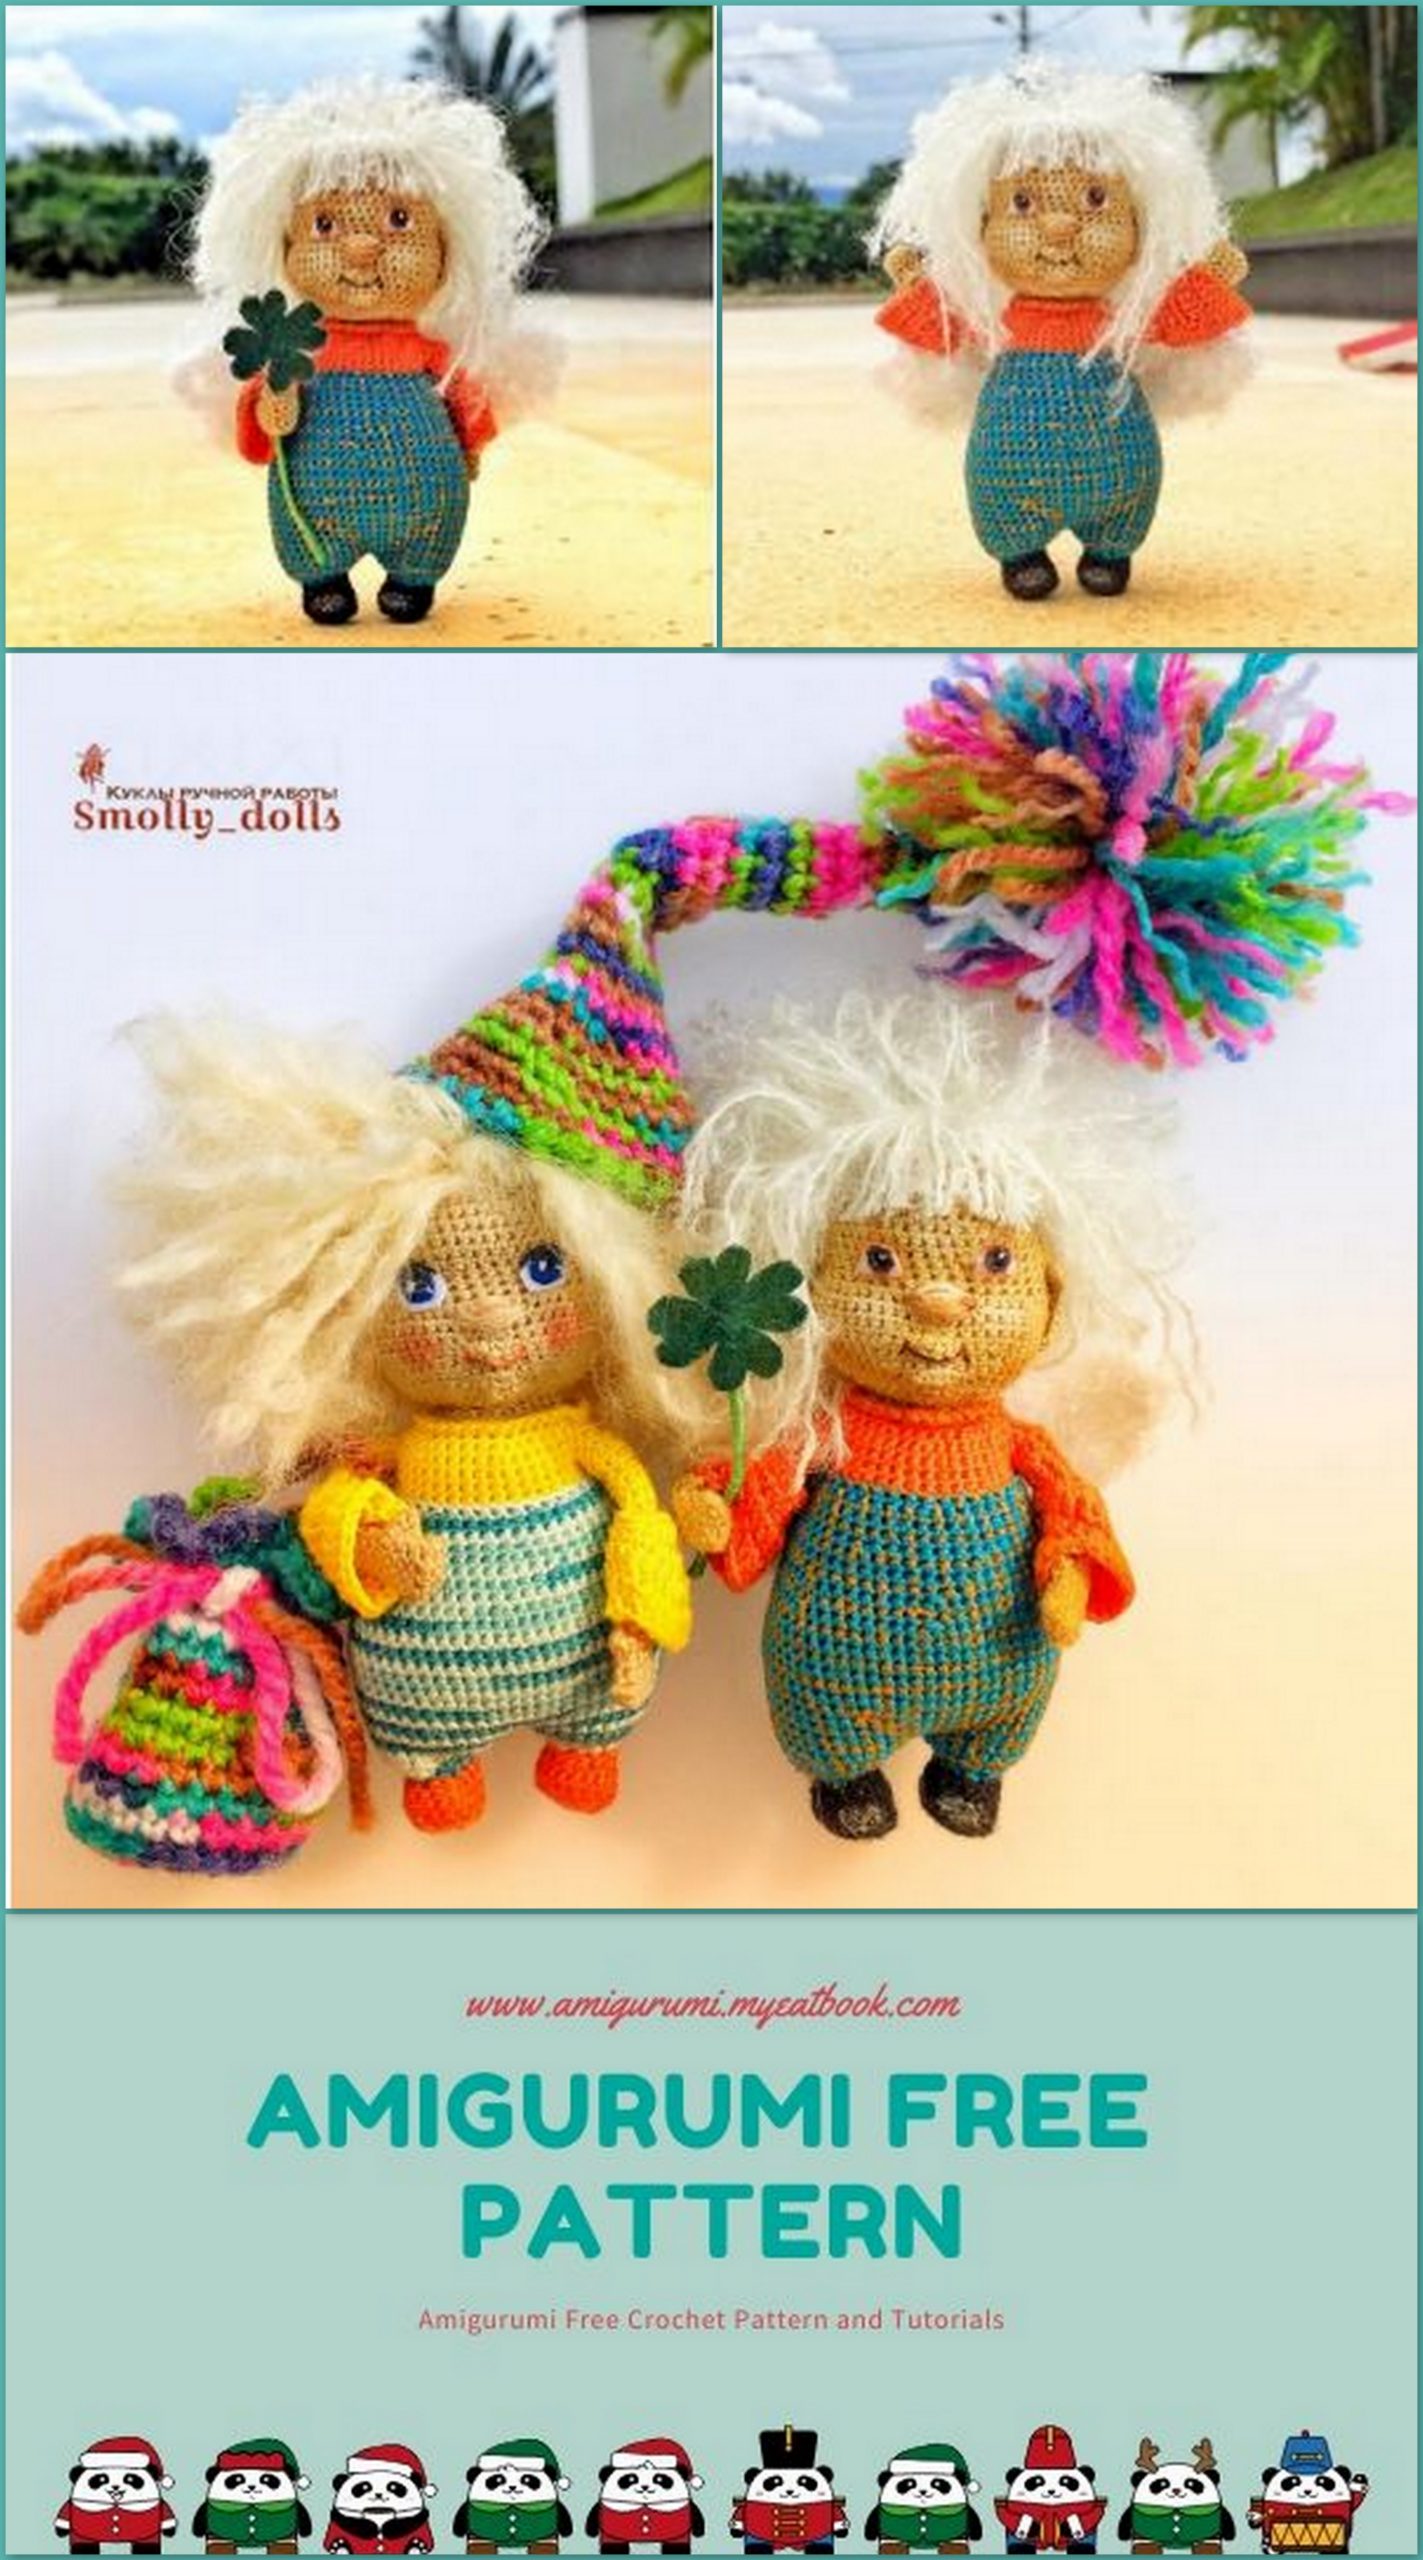
100% mercerized, 10g = 87m. Hook 1.0 mm. The height of the angel is about 10 cm. You can use
any other thread and corresponding hook.
2) For clothes and shoes – the same yarn (or similar thickness) as for the body, but in a different color. I
also used Cotton “Iris” Gamma 100% mercerized, 10g = 87m, blue, black and orange
colors.
3) Filler.
4) A wire with a cross section of 0.55 mm or any other suitable. 2 segments of 13-15 cm, for the hands.
5) Scissors, pliers.
For face and hair dolls:
1) For painted eyes and face: a small piece of white felt or any delicate white fabric, paint
acrylic, thin brush. Eyes can be embroidered, rolled up – at will.
2) Transparent glue (NOT superglue) for gluing the eye. I have a moment-crystal.
3) Yarn for hair – any shaggy thread of a suitable color (I have special yarn for doll hair).
4) Any means for tinting: pastels, paints, etc. (optional).
For wings: For wings, you can use any shaggy white yarn, 2 times thicker than the main yarn (for
me Adelia Valery 001, 50g = 146 m), hook 2.0 mm.
For clover: Wire, green thread and green felt.
Legend:
Ch – air loop
Sc – single crochet
Dec – decrease (one column of two loops)
İnc– increase (2 columns from one loop)
Sl-st – connecting column
Dc – Double crochet
Hdc – half crochet
Magic ring – amigurumi ring
I knit the wrong side, but you can also knit the front. Photos are for the wrong side and notes are made for the front.
Head.
Body thread. It is necessary to use a contrasting thread as the end of the row and make sure that the end of the row
was strictly in a straight line, perpendicular to the knitted rows. In case of displacement of the end of the row – knit
optional offset loops. Otherwise, the face will be asymmetrical.
1.Magic ring of 6 Sc (6)
2. İnc * 6 times (12)
3. (İnc, Sc) * 6 times (18)
4. (Sc, İnc, Sc) * 6 times (24)
5. (İnc, 3 Sc) * 6 times (30)
6. (2 Sc, İnc, 2 Sc) * 6 times (36)
7. (İnc, 5 Sc) * 6 times (42)
8. (3 Sc, İnc, 3 Sc) * 6 times (48)
9-13. 5 rows of 48 Sc
14.18 Sc, 2 Dec, 4 Sc, 2 Dec, 18 Sc (44)
15.44 Sc
16.44 Sc (I have +1 Sc offsets)
17.12 Sc, (İnc, Sc) * 5 times, (Sc, İnc) * 5 times, 12 Sc (54)
18. 54 Sc – in this place it is important to align the end of the row, if necessary, knit offset loops.
19.25 Sc, 2 Dec, 25 Sc (52)
20. 25 Sc, for the outer walls of the loops of the previous row: (Sc, Hdc) – in one loop, (Hdc, Sc) – in one loop, –
this will turn out the upper lip, these 4 loops do not further knit, for both walls – 25 Sc (54)
21. (3 Sc, Dec, 4 Sc) * 2 times, 3 Sc, Dec, 2 Sc, for the remaining internal walls of the 19th row – 2 İnc (see photo), for both
the walls of the previous row – 2 Sc, Dec, 3 Sc, (4 Sc, Dec, 3 Sc) * 2 times (48)
22.48 Sc
23. (3 Sc, Dec, 3 Sc) * 2 times, 3 Sc, Dec, 2 Sc, (Hdc, Hdc) – in one loop (Hdc, Hdc) – in one loop, 2 Sc, Dec, 3
Sc, (3 Sc, Dec, 3 Sc) * 2 times (44)
24.20 Sc, Dec of Hdc, Dec of Hdc, 20 Sc (42)
25. (Dec, 5 Sc) * 6 times (36)
26. (2 Sc, Dec, 2 Sc) * 6 times (30)
In the next row I knit on one wall of loops, so that then I sew my head to the body for the remaining walls,
using the hook.
If you are friends with a needle, you can sew your head with ordinary
way, in this case, you can knit the next row for both walls
loops.
27. For the inner walls of the loops of the previous row (Dec, 3 Sc) * 6 times
(24)
28. (Sc, Dec, Sc) * 6 times (18)
To fill the detail, paying particular attention to the area of the cheeks and forehead, the area
the eye should remain sunken.
29. (Dec, Sc) * 6 times (12)
30. Dec * 6 times, add filler, pull the hole, pull the thread,
leave the tip about 70 cm, trim.
The ears. Count 10 loops from the left corner of the mouth towards the left ear and
bring the thread there. Knit the first row Sc according to the pattern, the second row-turn, 10 Sc.
Count 2 rows up and one loop towards the left ear from the middle of the upper lip, put the thread there (photo).
Insert the hook into the same hole and pull out through 2 loops towards the other ear. Grab the thread and pull.
Repeat these steps 10 times. The threads in this case should overlap each other.
Insert the hook one loop closer to the left ear, bring one loop closer to the right ear from the already done
nose. Grab the thread and pull. Repeat these steps 5 times.
Once again, shift in the same way to the left and right by one loop and do the same actions 3 more times. Total nose
took 6 loops wide.
Bring the thread through 10 loops from another corner of the mouth and tie the ear symmetrically to the first (in mirror image).
Fasten and hide the thread inside the head.


Hair.
Starting from the crown, attach pieces of yarn (about 7 cm, 50-60 pcs.) Used for hair with
hook (insert the hook, grab the thread, pull out,
grab the thread again and pull it into the loop. Tighten the knot).
After filling the crown, attach the strands to the line of the ears and on the back of the head.
Hands (2 parts).
Body thread.
1.5 Ch, from the 2nd loop from the hook 3 Sc, 3 Sc into 1 loop, 3 Sc (9)
2-4. 3 rows of 9 Sc
5. On the first hand: 3 Ch, starting from the second loop from the hook 2 Sc by Ch (thumb), 9 Sc
On the second hand: Sc, 3 Ch, starting from the second loop from the hook 2 Sc by Ch (thumb), 8 Sc
6. Dec, 7 Sc (8)
7-11. 5 rows of 8 Sc.
Fasten and cut the thread. Make a wireframe. Bend a piece of wire 13-15 cm in half, forming
a small loop at the fold. Twist the two ends together. Paste in the hand.
12. Change the thread to red, join the knitting along the line of the finger
(photo), and starting from the next loop, tie 8 Sc.
13.8 Sc behind the inner walls of the loops.
14-17. 4 rows of 8 Sc, fasten and cut the thread.
Sleeve.
Join the left outer walls of the 12th row of the arm, along the line
fingers (photo) and knit (İnc, Sc) * 4 times (12)
3 Sc, 2 Dc, (Dc, Dc) – in one loop, (Dc, Dc) – in one loop, 2 Dc, 3 Sc (14)
3 Sc, 3 Dc, (Dc, Dc) – in one loop, (Dc, Dc) – in one loop, 3 Dc, 3 Sc (16)
7 Dc, (Dc, Dc) – in one loop, (Dc, Dc) – in one loop, 7 Dc (18)
8 Dc, (Dc, Dc) – in one loop, (Dc, Dc) – in one loop, 8 Dc (20)
Fasten thread, cut
Boots, black thread (2 parts)
1. A chain of 6 Ch, from the second loop from the hook 4 Sc, 3 Sc into 1 loop, 4 Sc, Sc into the 6th loop of the chain (12)
2. İnc, 3 Sc, İnc, Sc, İnc, 3 Sc, İnc, Sc (16)
3. 16 Sc for one wall (the front when knitting the front and the back when knitting the wrong side).
4.16 Sc over both walls
56.6 Sc, 2 Dec, 6 Sc (14)
6.5 Sc, 2 Dec, 5 Sc (12)
Cut, fasten, hide the thread, attach the blue thread.
7.12 Sc
8. İnc * 12 times (24)
9.24 Sc, cut the thread on the first leg
On the second leg – knit Sc to the middle of the inner side of the leg (in
I got 8 Sc), attach the second leg: position the shoes
correctly so that the socks look one way, visually identify
the loop you need to join in order to keep the correct
position, 24 Sc along the second leg (do not forget when knitting the wrong side
insert the hook from the inside), Sc into the same loop where the first one is connected
column of 24, along the first leg: Sc into the same loop where it was connected
last column, 24 Sc (50)
10. (9 Sc, İnc) * 5 times (55)
11-14. 4 rows of 55 Sc
15. (İnc, 10 Sc) * 5 times (60)
16-22. 7 rows of 60 Sc
23. (Dec, 8 Sc) * 6 times (54)
24. 54 Sc
25. (3 Sc, Dec, 4 Sc) * 6 times (48)
26. 48 Sc
27. (Dec, 6 Sc) * 6 times (42)
28-29. 2 rows of 42 Sc
30. (2 Sc, Dec, 3 Sc) * 6 times (36).
Fasten, cut, hide the thread
inside. Attach the red thread.
31. For the inner walls of the hinges 36 Sc
Knit Sc to the side (I haveit turned out 10 Sc). We will consider it
place at the end of the row (photo).
32. 8 Sc by hand (do not forget to enter
inside hook when knitting inside out),
Sc to the same loop of the body where it was connected
last body column, 18 Sc, 8 Sc by
hand, Sc in the same loop where it was connected
18th post, 18 Sc (54)
33. On the arm 4 Dec, 19 Sc, on the arm 4 Dec, 19
Sc (46)
Twist the ends of the wires together, bend into a ring and insert into the body.
34. 2 Dec, 19, 2 Dec, 19 (42)
35. (Dec, 5 Sc) * 6 times (36)
36. (2 Sc, Dec, 2 Sc) * 6 times (30)
Make a harness for beauty – for the outer walls of the loops (Sl-st, Ch) – in a circle. Cut, fix, hide the thread.
Fill the part tightly.
Change thread to bodily.
37. Attach to the inner wall
loops of the previous row anywhere.
Knit 30 Sc.
38. For the inner walls of the loops
previous row 30 Sc.
In the next row I knit for the inside
walls to sew for the remaining walls
body with previously left loops on
to the head. If on the head they knitted for both
walls, then knit this row for both walls.
39. For the inner walls of the loops (Dec, 3 Sc) * 6 times (24)
40. (Sc, Dec, Sc) * 6 times (18)
41. (Dec, Sc) * 6 times (12)
42. Dec * 6 times (6)
Leave the long tip of the thread for sewing on the head, put the thread in the 38th row, where the loops remained, and, capturing
the remaining loops of the body and head at the same time, sew the parts together (or just with a needle, if desired).
Wings.
Adelia “Valery” 50 g = 146 m or any other suitable thread, hook 2.0 mm.
1.19 Ch + 3 Ch lift
2. With 4 loops from the hook 19 Dc (20), 3 Ch lift, turn
The result was a strip. First, tie one wing in half of this strip, then similarly the second wing in
second half.
3. 9 Dc, 3 Ch lift, turn
4. Dc at the base of the lifting stitches, 2 Ch, (İnc from Dc, 2 Ch) * 4 times, (İnc from Dc, 3 Ch) * 3 times, (İnc from Dc, 4 Ch) * 2
times.
Fasten and cut the thread.
Adjoining
Sew a thread from the other end and knit 2 rows similarly to rows 3.4. Get the second part.
Fold in the internal parts and sew in the base, sew the wings.
Face.
Locate on your face places where you can see a decrease above the nose. In these places you will need to glue your eyes.
Cut out two parts for the eyes from felt or other white fabric, as shown in the photo. Draw black
circles. On the sides of the nose, paint the cheeks, top of the nose and chin (or other medium Twami tinting). Glue the eyes after drying, draw white highlights. Hang around your eyes and
light brown around the mouth. Add color to the upper lip along the edge of the knit (contour).
Focus on the photo.
I applied paint to my pants with a thin brush in strips to make cells and folds
legs, also applied a little white paint to the ends of the shoes.
Separated the first row of hair to her face, cut off along the length of her bangs and lightly glued to her forehead.
Clover – a piece of wire wrapped in green thread and glued. A flower cut out of green felt and
glued to the wire.
According to the same description, I turned out to be a little house or a gnome.